Stinson Station Wagon, NC9391K Restoration

Skip to content
  • Home
  • Random Photos
  • Before and After
  • Fritz Womack
  • N9391K Photos
  • Reference Data
  • Wiring
  • Franklin Engine
  • 108-2 Ignition Switch and Magneto Connection
  • Marvel Carburetor MA4-5
  • Part Numbers
  • Flap Hinge Covers
  • Fuel System
  • About Jeff
  • Misc. Useful Information
  • Required Placards

Images

Fritz with the Stinson in 1967
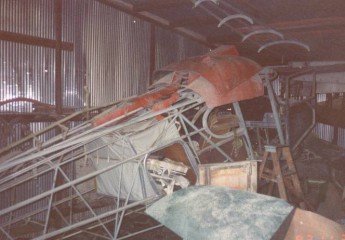
Stored in the hangar for over 40 years.
Iphone 001
Iphone 033
Iphone 047
Iphone 062
Iphone 029
Cleaned and ready for Primer
Iphone 168
Iphone 046
Panel before....
Panel before….
Iphone 075
Sandblasting the fuselage in the back yard.
Iphone 020
Iphone 024
Iphone 029
Iphone 009
Iphone 044
Owner produced replacement flooring.
Before and After floor
Floor fitting
Floor fitting
Floor heating vent
Floor heating vent

Stinson Station Wagon, NC9391K Restoration

The restoration of a 1947 Stinson Station Wagon owned by our grandfather, Fritz Womack.

Skip to content
  • Home
  • Random Photos
  • Before and After
  • Fritz Womack
  • N9391K Photos
  • Reference Data
  • Wiring
  • Franklin Engine
  • 108-2 Ignition Switch and Magneto Connection
  • Marvel Carburetor MA4-5
  • Part Numbers
  • Flap Hinge Covers
  • Fuel System
  • About Jeff
  • Misc. Useful Information
  • Required Placards
October 2026
S M T W T F S
 123
45678910
11121314151617
18192021222324
25262728293031
« Aug    

Enter your email address to subscribe to this blog and receive notifications of new posts by email.

Join 26 other subscribers

Images

Fritz with the Stinson in 1967
Stored in the hangar for over 40 years.
Loading it up to take it home
Arrived at home.
Arrived at home.
Family members helping to strip the fuselage bare.
Sandblasting the fuselage in the back yard.
Primer applied
Primer applied
Waiting for paint to dry
Ready to take it home.
Priming the rudder
Priming the rudder
Paint applied to the rudder
Elevator half cleaned and ready for primer
Primer applied
Primer applied
Paint applied
Paint applied
Before and After floor
Owner produced replacement flooring.
Floor fitting
Floor fitting
Floor heating vent
Floor heating vent
Cleaned and ready for Primer
Fitting the door
Fitting the door
Painted door
Painted door
Elevator feedthrough
Going back together.
trammeling the wing
trammeling the wing
Panel before....
Panel before….
Original wiring harness
New wiring harness
New wiring harness
Instrument panel
Instrument panel
Wiping down the wing
After rib stitching, first coat of filler.
Paint applied
Paint applied
img_0762
Registration number on the bottom
img_4302
Door panel fitting
Door panel fitting
Door knob fitted
Door knob fitted
Tail wheel
Tail wheel
External door handle
Door fitting
Door fitting
Bottom cowl painted
Bottom cowl painted
Cousin Doug stopped by to check progress
Loaded up for trip to the hangar
Hangar arrival
Hangar arrival
Wings on at the hangar.
Rudder and elevators installed
Fueling up to check for leaks...no leaks.
Fueling up to check for leaks…no leaks.
Pushed out of the hangar to clean the hangar
View from the top.
View from the top.
Leave a comment Posted on January 7, 2019 Uncategorized

Pile of parts to paint

Parts to paint. A few are still waiting for repairs.

img_9647

Leave a comment Posted on January 6, 2019January 6, 2019 Uncategorized

Before and After/Front Engine Baffle

Leave a comment Posted on January 6, 2019January 6, 2019 Uncategorized

Right Wheel Pant

This one seems to be in worse shape. Lots of patches, cracks, and dents to fix.

Drilling all the pop rivers out and replacing them with solid rivets.

1 Comment Posted on January 6, 2019 Uncategorized

Left wheel Pant, Fairing, and Fillet assemblies

Trying on for size. The red paint on the fillet is not the final color.

Leave a comment Posted on January 4, 2019 Uncategorized

Engine Baffle Repairs

img_9578
img_9577
img_9576

I think I will just make new ones.  Lots of crack repairs have been made and they would look better new.


4 Comments Posted on January 2, 2019 Uncategorized

Polishing

Polishing more of the engine shroud.

Leave a comment Posted on January 2, 2019 Uncategorized

Too Busy to Post Part 2

Getting ready to repair and polish more of the engine cooling shroud.

Leave a comment Posted on January 2, 2019 Uncategorized

Too Busy to Post

Finding the right knob for the glove box.

1 Comment Posted on December 19, 2018 Uncategorized

Glove Box Door

New knob in place and door installed.

img_9263

img_9263

3 Comments Posted on December 17, 2018 Uncategorized

Globe Box

Polishing up to finish the instrument panel.

Posts navigation

← Older posts
Newer posts →
Blog at WordPress.com.
Stinson Station Wagon, NC9391K Restoration
Blog at WordPress.com.
  • Subscribe Subscribed
    Stinson Station Wagon, NC9391K Restoration
    Join 26 other subscribers

    Have a WordPress.com account? Log in now.

  • Stinson Station Wagon, NC9391K Restoration
    View site in Reader
    Manage subscriptionsSign upLog in
    Report this content
    Collapse this bar
Loading Comments...